Tier 1 — Hack The Box — Mission: Sequel
1. Setting Up Your Environment
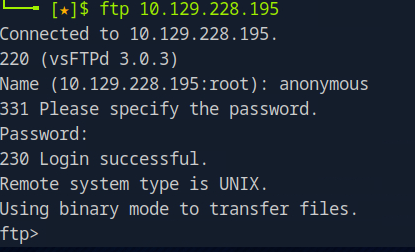
Before diving into the database, you need to ensure your environment is correctly set up. For this mission, you’ll be using Pwnbox or your own local machine connected via VPN to the Hack The Box environment. Once you’ve connected to the target machine’s IP address, your first step will be to explore the SQL database.
Ensure your tools are ready — most likely, you’ll be using the command-line interface to interact with the database. Tools like mysql, psql, or other SQL clients will help you execute the queries necessary to extract the information you need.
2. Understanding SQL and the Role of Databases in Security
SQL (Structured Query Language) is the language used to interact with databases. In this mission, your goal is to query the database to reveal hidden information — specifically a flag. SQL databases store data in tables, and by using various SQL commands, you can retrieve, filter, and analyze this data.
Common SQL commands you’ll use include:
SELECT: Retrieves data from a table.SHOW TABLES: Lists all tables in the database.DESCRIBE: Shows the structure of a table, including its columns.WHERE: Filters query results based on conditions.
Understanding these basics will allow you to effectively interact with the database and extract the flag.
Task 1

The first step in this mission is to scan the target machine to discover any open ports associated with SQL services. By using Nmap, you can efficiently scan the network, detect open ports, and identify the services running on those ports.
To begin, use the following command:
nmap -sV -sC 10.129.36.198Let’s break this command down:
-sV(Service Version Detection): This option tells Nmap to detect the version of the service running on each open port. Knowing the exact version of a service is crucial because it allows you to identify any known vulnerabilities associated with that version. For example, if a MySQL service is running on an outdated version, there may be well-documented exploits available.-sC(Default Script Scan): This option runs a set of default Nmap scripts against the open ports to gather additional information about the services. This could include detecting whether the service requires authentication, what protocols it uses, and any additional details that might help during the exploitation phase.
2. Identifying SQL Ports
SQL databases tend to run on default ports, which can be a giveaway when you’re scanning a target. The most common default port for SQL services is 3306, which is typically used by MySQL. By scanning for open ports, you can quickly identify if an SQL service is running on the target machine.
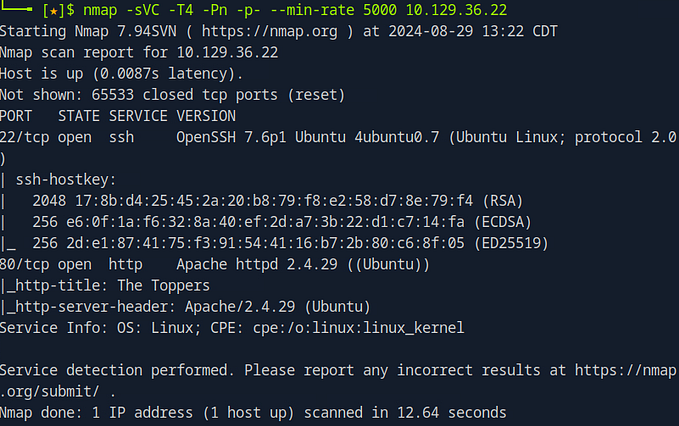
For example, once your Nmap scan completes, you may see output similar to this:

1. Running an Nmap Scan
The first step in identifying SQL services on your target machine is running a comprehensive Nmap scan. Using the same command we used earlier, you can discover the services running on the machine, along with their versions:
Just as a reminder, let’s break down the key components of this command:
nmap -sV -sC 10.129.36.198-sV: This flag enables service version detection, helping you identify the specific versions of services running on open ports. Knowing the exact version can help you research potential vulnerabilities associated with that service.-sC: This flag runs default scripts to gather additional information about the services detected. It’s a great way to quickly gain extra insights without needing manual checks.
After running this scan, the output will show a list of open ports and the services running on those ports. For example, you might see that MariaDB is running on the target machine, an important discovery for the next phase of the penetration test.
2. What is MariaDB?
MariaDB is an open-source relational database management system (RDBMS) that was created as a community-driven fork of MySQL. Like MySQL, MariaDB uses SQL (Structured Query Language) for managing and querying data. It’s known for its high performance, scalability, and robust features, which make it a favorite choice for web applications, especially in environments that require open-source software.
MariaDB is fully compatible with MySQL, meaning you can use the same queries, commands, and configurations for both. However, MariaDB has added improvements and features that differentiate it from MySQL, particularly in terms of performance optimization and security features.
Task 3

1. Understanding the mysql Command
To interact with the MariaDB database on your target machine, you’ll use the mysql command in your terminal. This command-line tool allows you to connect directly to the database, where you can execute SQL queries, retrieve data, and explore potential vulnerabilities.
Here’s the general format of the command:
mysql -u [user] -h [host_ip_address]Let’s break down each part:
-u(User): This flag specifies the username you’re using to log in to the database. The username you use will depend on the credentials available to you, which could be the default user or one you’ve uncovered through your reconnaissance.-h(Host): This flag tellsmysqlwhich host IP address you’re connecting to. In the context of Hack The Box, this will be the IP address of the target machine running the MariaDB database.
Task 4

1. What is the Root Account in MariaDB?
The root account in MariaDB is the superuser account that has full administrative control over the database server. Much like the root account in Linux systems, the root user in MariaDB has unrestricted access to perform any operation on the database. This includes creating and deleting databases, managing users, executing queries, and modifying data. The root account is often the most powerful and sensitive user in the database, making it a prime target for attackers.
By default, the root account is created when MariaDB is installed, and it is typically used for initial setup and administrative tasks. Because of its high level of access, the root account should be closely guarded, and securing it is a top priority for database administrators.
2. Why Target the Root Account?
For penetration testers, gaining access to the root account provides the ability to control the entire database system. With root access, you can view all data, alter the structure of the database, and potentially pivot to other parts of the system if the database is linked to other critical services.
However, targeting the root account requires understanding the security mechanisms in place. Administrators often secure this account with strong passwords, multi-factor authentication, or limit access by IP address. Therefore, successfully compromising the root account can involve a combination of methods such as password guessing, exploiting configuration vulnerabilities, or using social engineering techniques.
Task 5

1. What Does * Do in SQL?
In SQL, the * symbol is shorthand for "select all." When you use * in a SELECT statement, it tells the database to return all columns from the specified table. For example:
SELECT * FROM users;
This query will retrieve every column for every row in the users table, displaying all the data contained within it. It’s a quick way to get a full view of the table’s contents without listing every column individually.
2. When to Use * in Queries
While using * can be a time-saver, especially when working with tables that have many columns, it’s important to understand when it's appropriate to use. For example, during exploratory queries or in situations where you need all the data, * is convenient. However, in production environments or when handling large datasets, specifying only the columns you need is often a better practice. This limits the data returned, improving query performance and reducing the load on the database.
Task 6

When working with SQL, there’s a small but critical detail that often gets overlooked by beginners and even seasoned developers: ending your queries with a semicolon (;). While it may seem like a trivial step, the semicolon plays an important role in ensuring your SQL queries run smoothly and as intended. In this guide, we’ll break down why the semicolon is essential, how it affects query execution, and how you can avoid common pitfalls by making it a habit.
1. What is the Semicolon’s Role in SQL?
The semicolon (;) in SQL marks the end of a query. It’s a signal to the database system that the statement is complete and ready for execution. In environments where you’re running multiple queries, such as in a script or a database console, the semicolon helps separate one query from the next. For example:
SELECT * FROM users;
SELECT * FROM orders;
Each query is treated as a separate instruction because of the semicolon. Without it, the system may not know where one query ends and another begins, leading to errors or unexpected behavior.
3. Why Not Using the Semicolon Can Cause Problems
Failing to use the semicolon can lead to a variety of issues, including:
- Syntax Errors: Some databases will throw an error if they don’t see the semicolon to mark the end of a query.
- Query Merging: Without a semicolon, the system may attempt to merge queries or fail to execute them correctly, particularly when you’re working with more than one query in a batch.
- Portability Issues: Different database systems handle query execution slightly differently. By using the semicolon consistently, you ensure that your SQL code works across multiple platforms without needing modification.
Task 7

Now that you’ve successfully connected to the target machine in your Hack The Box challenge, it’s time to start digging deeper into the databases. By listing the available databases, you can begin to identify where the valuable information might be hidden. In this guide, we’ll walk through how to discover and analyze the databases on the target machine, and identify where to focus your efforts to complete the task.
1. Listing the Databases
Once you’re connected to the target machine’s SQL environment, the first step is to see what databases are available. The command to reveal this is simple but powerful:
SHOW DATABASES;When you run this command, it will list all the databases on the machine. In most cases, you’ll see the standard system databases, which typically include:
- information_schema: This holds metadata about the database structure itself, such as information about tables, columns, and other database objects.
- mysql: This database contains essential data for the MySQL server’s operation, including user permissions, password information, and other system settings.
- performance_schema: This is used to monitor the performance of the MySQL server, tracking things like query execution times and resource usage.
However, in this case, you notice something interesting — an additional database named htb. This is not one of the default system databases, which suggests it may contain the hidden data or flag you’re looking for.

2. Identifying Key Targets
The presence of the htb database is a strong indicator that this is where the task’s relevant information is stored. When you come across a non-default database like this during a penetration test, it’s often worth investigating further. The next step would be to switch to the htb database and start examining its tables.
To switch to the database, use:
USE htb;
Task 8
Capturing the flag
After successfully connecting to your target machine and identifying the relevant database, it’s time to dive deeper and extract the valuable information hidden within the tables. In this guide, we’ll walk you through the process of querying data from a SQL database using the SELECT command. By understanding how to retrieve all the data from specific tables, you’ll be equipped to uncover critical information—like flags in a Hack The Box challenge. Let’s explore how to access and display the contents of tables efficiently.
1. Listing the Tables in the Database
Once you’re connected to the proper database, the first step is to see what tables are available. In SQL, tables store the actual data, and discovering these tables is your gateway to the information you’re after. To list the tables in the current database, you use the following command:
SHOW TABLES;
2. Querying Data from the Tables
With the tables identified, the next step is to retrieve all the data they contain. To do this, you use the SELECT command along with the * symbol, which instructs SQL to display all columns for every row in the table. For example, to see everything stored in the users table, you would run the following command:
SELECT * FROM users;
Similarly, to access the data in the config table, you use:
SELECT * FROM config;
These queries will return all the data in the respective tables, allowing you to see the information stored within. In this case, upon running the query for the config table, you find the flag for the event—a successful conclusion to this part of your challenge!
For more guides like this, feel free to follow me on Substack.